공부/코딩
Flutter로 리스트 페이지 만들기
확두뇌
2025. 1. 11. 15:21
flutter 프로젝트 생성하기 - 프로젝트 이름은 모두 소문자로 작성하기
* 이미지 삽입 시에는 assets 폴더 아래에 이미지 넣기

main.dart에 코드 작성
import 'package:flutter/material.dart';

void main() {
  runApp(const MyApp());
}

//return 다음에 넣고 싶은 코드 작성하기
class MyApp extends StatelessWidget {
  const MyApp({super.key});

  @override
  Widget build(BuildContext context) {
    return ShopItem();
  }
}

//자주 쓰는 코드나 블럭은 class로 만들어 묶어 놓으면 재사용 편리함
class ShopItem extends StatelessWidget {
  const ShopItem({Key? key}) : super(key: key);

  @override
  Widget build(BuildContext context) {
	  //MaterialApp으로 작성하면 여러 기본 설정들이 자동으로 되서 편함
    return MaterialApp(

	    //3단계 구성으로 home, body, bottomNavigationBar으로 구분해서 만들 수 있음
      home: Scaffold(
        appBar: AppBar(
          title: Text("상암동"),
          backgroundColor: Colors.blueGrey,
          leading: IconButton(
            icon: Icon(Icons.search),
            onPressed: () {
              // 돋보기 아이콘을 눌렀을 때의 동작
            },
          ),
          actions: [
            IconButton(
              icon: Icon(Icons.more_vert), // 종 모양 아이콘
              onPressed: () {
                // 종 모양 아이콘을 눌렀을 때의 동작
              },
            ),
          ],
        ),
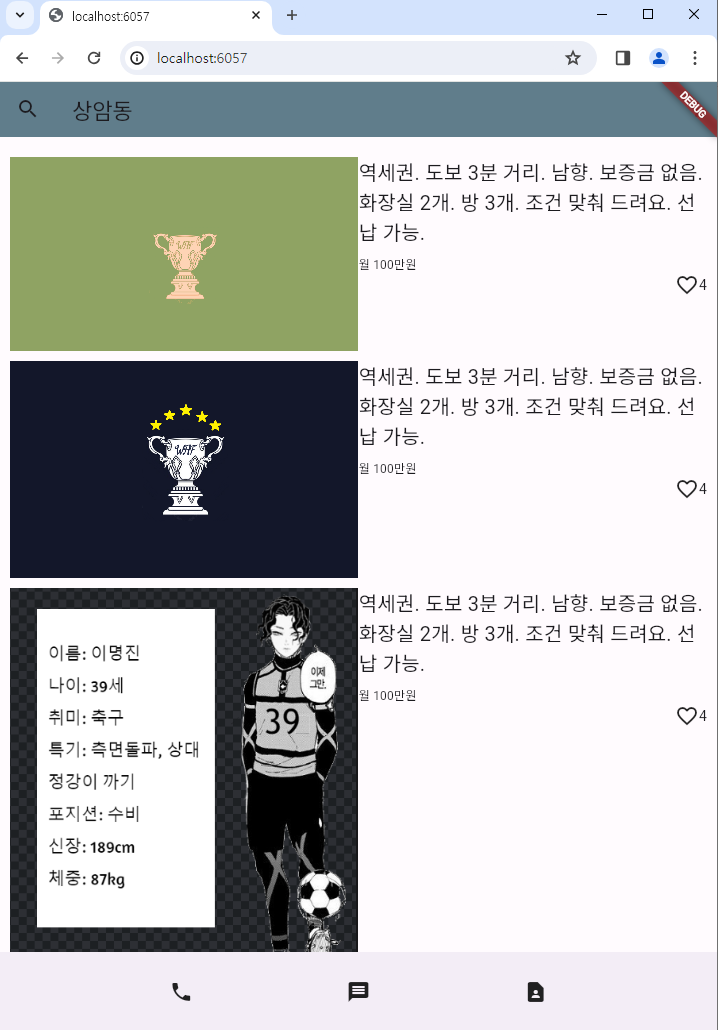
        body: ListView(  //ListView로 감싸면 내용물이 늘어나면 스크롤이 자동으로 생성됨
          padding: EdgeInsets.all(10),
          children: [
            SizedBox(height: 10),
            ShopItemGroup(image: 'image.png', text: '역세권. 도보 3분 거리. 남향. 보증금 없음. 화장실 2개. 방 3개. 조건 맞춰 드려요. 선납 가능.', price: '월 100만원'),
            SizedBox(height: 10),
            ShopItemGroup(image: 'image2.png', text: '역세권. 도보 3분 거리. 남향. 보증금 없음. 화장실 2개. 방 3개. 조건 맞춰 드려요. 선납 가능.', price: '월 100만원'),
            SizedBox(height: 10),
            ShopItemGroup(image: 'image3.png', text: '역세권. 도보 3분 거리. 남향. 보증금 없음. 화장실 2개. 방 3개. 조건 맞춰 드려요. 선납 가능.', price: '월 100만원'),
            SizedBox(height: 10),
            ShopItemGroup(image: 'image.png', text: '역세권. 도보 3분 거리. 남향. 보증금 없음. 화장실 2개. 방 3개. 조건 맞춰 드려요. 선납 가능.', price: '월 100만원'),
            // 추가 그룹을 필요한 만큼 계속 추가할 수 있습니다.
          ],
        ),
        bottomNavigationBar: BottomAppBar(
          child: Row(
            mainAxisAlignment: MainAxisAlignment.spaceEvenly,
            crossAxisAlignment: CrossAxisAlignment.center,
            children: [
              Icon(Icons.phone),
              Icon(Icons.message),
              Icon(Icons.contact_page)
            ],
          ),
        ),
      ),
    );
  }
}

//그룹으로 묶어서 관리함
class ShopItemGroup extends StatelessWidget {
  final String image;
  final String text;
  final String price;

  const ShopItemGroup({
    Key? key,
    required this.image,
    required this.text,
    required this.price,
  }) : super(key: key);

  @override
  Widget build(BuildContext context) {
    return Row(
      mainAxisAlignment: MainAxisAlignment.spaceEvenly,
      crossAxisAlignment: CrossAxisAlignment.start,
      children: [
        Expanded(
          child: Image.asset(image),
        ),
        Expanded(
          child: Column(
            crossAxisAlignment: CrossAxisAlignment.start,
            children: [
              Text(
                text,
                style: TextStyle(fontSize: 20.0),
                maxLines: null, // null로 설정하여 줄 바꿈을 자동으로 처리
                overflow: TextOverflow.clip, // 텍스트가 오버플로우 되었을 때 잘리지 않고 클립되도록 설정
              ),
              SizedBox(height: 8.0), // 각 텍스트 사이에 간격을 주기 위해 SizedBox 추가
              Text(
                price,
                style: TextStyle(fontSize: 12.0),
                maxLines: null, // null로 설정하여 줄 바꿈을 자동으로 처리
                overflow: TextOverflow.clip, // 텍스트가 오버플로우 되었을 때 잘리지 않고 클립되도록 설정
              ),
              Row(
                mainAxisAlignment: MainAxisAlignment.end,
                children: [
                  Icon(Icons.favorite_border),
                  Text("4")
                ],
              )
            ],
          ),
        ),
      ],
    );
  }
}
chrome으로 설정한 후 실행하면 미리 보기 가능